How to Lay Wood Flooring Over Concrete
High-quality engineered wood flooring is more stable and versatile than solid wood flooring. It’s also quicker and easier to fit than solid wood planks; as a result, DIY installation of engineered wood flooring is becoming more popular. So, how should you go about laying engineered wood flooring over concrete?
Fitting Wood Flooring Over a Concrete Sub-Floor
If you have a concrete or screed subfloor, you can glue down your engineered wood flooring using a flexible flooring adhesive, or you can ‘float’ the boards over an underlay. Floating is popular cost-effective choice for DIY wood flooring installation and there are certain situations where it can be a good option, such as when there is a need for noise reduction.
In most circumstances, we highly recommend fully bonding (gluing down) wood flooring to the concrete; we believe it gives a more solid, durable feel than a floated floor, with less bounce underfoot. With that in mind, we’ll focus on the fully bonding method in this journal entry.
Before You Start Laying Your Wood Flooring Onto Concrete
Is the Concrete Dry?
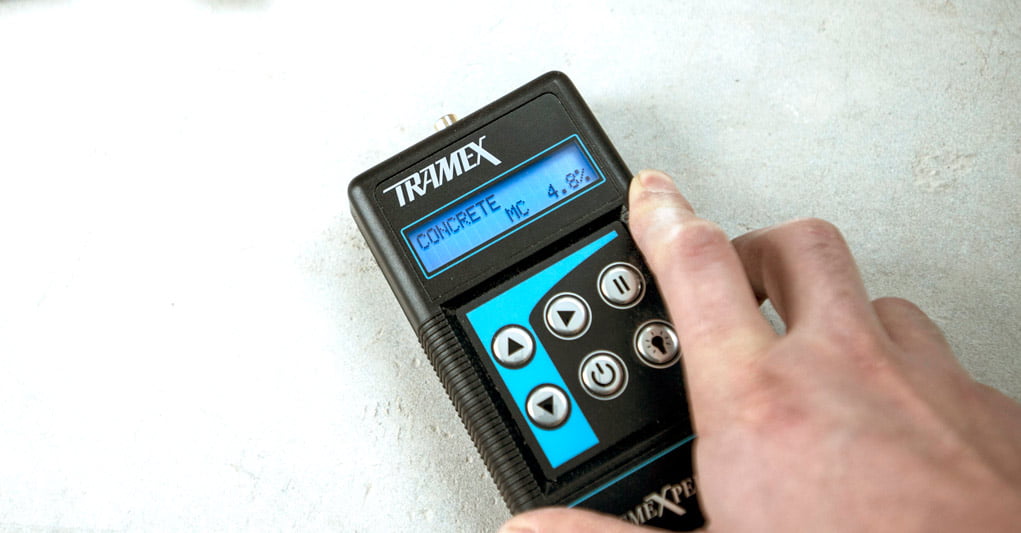
Before laying wood flooring over concrete sub-floors, the concrete must be completely dry — always check the moisture content the subfloor with a moisture meter (hygrometer) prior to fitting; if it reads too high, extra time must be allowed to let the sub-floor dry out.
Concrete can take around 1 full day to dry for each 1mm of thickness; for screeds over 60mm thick, this drying time is doubled for anything over 60mm thickness (to 2 days per each 1mm). For example, an 80mm screed would require 60 days for the first 60mm, then 40 days for the additional 20mm thickness — totalling 100 days.
New concrete slabs must be fully cured before covering them with wood flooring. They require a minimum drying time of 60 days. Ideally, moisture content of a concrete subfloor should not exceed 2% MC (moisture content).
If the moisture levels remain high, you can install a suitable damp proof membrane. It’s worth noting that below ground applications (e.g., basements) are susceptible to moisture and should always be thoroughly tested for moisture content prior to installation.
Is the Concrete Flat and Level?
Concrete and screed must also be flat and level (level within 3mm in a 3m radius). Grinding high spots in concrete is recommended as opposed to using filling compounds. If a filling or levelling compound is used, it must be a Portland-based compound with a high compressive strength.
It’s vital to ensure a proper bond of the adhesive between the concrete and the planks, so it should be smooth and free of structural defects; loose or flaky concrete must be removed. The concrete must also be free of paint, oil, existing adhesives, wax, grease, dirt, sealers, and curing compounds.
Have Your Planks Been Acclimatised?
To ensure successful fitting, your planks must be fully acclimatised before you lay them. So, make your beautiful wood flooring feels at home. For our engineered planks, we recommend having these stored in the room where they are going to be laid — or an adjoining room (or as close as feasibly possible) — for a minimum of 72 hours. They need a stable environment of normal comfortable living conditions. As a guide, we recommend maintaining 15-24° C and humidity of 40-65% for 14 days prior, during and after installation.
See our journal entry on site conditions and our floor fitting guide for more details on what you need to do before laying wood flooring onto a concrete subfloor.
Getting Started
To get going with laying your wood flooring over concrete, you need to first select a starter wall. It’s recommended to start the installation along an exterior wall because it’s more likely to be straight and square with the room. Work systematically, starting at the opposite end to the door you want to exit through.
Measure out from the wall the width of your first plank plus a 15mm expansion gap. Accurately mark this measurement at each end of the room and set your laser line or snap a chalk line. You can secure a straight edge along this guide line to ensure alignment if necessary.
Plan Ahead: Lay Your Planks Out in Advance
Before gluing down the planks, we recommend laying out the flooring in advance. By laying out in advance you can plan to achieve a random pattern and cut out any unwanted imperfections (larger filled knots etc) to your advantage and create your ideal aesthetic. That said, extra allowance must be made for this within the wastage factor (as standard we recommend 10% wastage on all orders). Alternatively, any boards that are a little too characterful can be used in less conspicuous positions.
Staggering Wood Flooring Joints
Stagger the end joints of the boards by at least 150mm and use mixed-length boards to create wood flooring with a timeless traditional look.

When the final board of any row needs cutting the remaining piece can often be used to start the next row, reducing wastage.
Align the First Row
Align the first board along the line with the tongue resting on the laser or chalk line and the groove facing the starting wall. Make sure that the whole row is perfectly straight.
Spreading The Adhesive
When laying wood flooring over concrete, we recommend Mapei P990 or Pallman P4/P5/P6 flexible wood flooring adhesives. Use the correct sized notched flooring adhesive trowel (bearing in mind that each adhesive has different requirements) at a 45° angle to evenly spread the adhesive. Evenly apply the adhesive to the sub-floor and ensure there’s enough coverage; this is vital in order to create a proper and permanent bond between the bottom of the wood flooring and the concrete.
Install Your Starter Rows
Spread adhesive out from the guide line about 750mm. Install the first row of starter planks with the tongue side of the plank facing the straight edge and secure into position. Pull the planks together tightly at the joints and apply downward pressure on the planks, pressing them firmly into the adhesive. Tape the joints with low tack masking tape (e.g., 3M blue masking tape) to prevent movement. The boards should fit together perfectly with no gaps, bumps, lips or raised areas apparent from one section of the floor to another.
It’s a good idea to let your starter rows cure before continuing with the fit. This will mean you are less likely to knock them out of line.
Work in Small Sections
Continue with installation and work in small sections; this will allow you to reach across the adhesive to install the wood flooring without putting any weight on it. You should never work on top of the flooring when installing with the glue down method, so never lay planks further than you can comfortably reach.
Don’t spread more adhesive than can be covered by planks within the time recommendation listed in the adhesive’s instruction label. Take note of your adhesive’s drying time so you can plan and lay your wood flooring in sections accordingly.
Continue Laying the Rest of Your Wood Flooring
Once the starter rows are secure, spread 750mm of adhesive along the length of the room for the next row. Place the tongues into the grooves of your planks and press the planks firmly into the adhesive. You should never slide planks through the adhesive as this can push adhesive into the tongue and groove joints.
Use 3M blue masking tape or ratchet clamps to hold planks securely in place as you are installing. Use caution if using a rubber mallet to butt material together because it can burnish or mar the finish.
It’s a good idea to test for proper bonding by occasionally lifting a board; look for good coverage (90%), then place back it into the adhesive. Be sure to clean any adhesive off the surface of planks before it cures.
N.B. Please note, this laying advice is for guidance only — we would always recommend using an experienced fitter to lay our floors. Chaunceys cannot be held responsible for any problems encountered due to following the above advice.
Request a Fitting Quote
Chaunceys can provide an expert supply and fit service for you – please contact us for a hassle-free quote.